how to make soy wax candles
I burn a lot of candles. Because I like fragrant things! Stop making assumptions about me!
5 years ago, I was dropping $30-40 every few weeks for something I literally lit on fire (and didn’t even smoke! RETCH!) and knew there had to be another way. I’ve always loved a good DIY, so I took a soy candle-making class at Maker’s Mess in Los Angeles.
“Oh, that’s it?” I thought mid-way through.
Since then, I’ve been making my own soy candles. Last time I did some math (double RETCH), I calculated that I was spending around $3-5 for each one.
“But I can get a candle for $5 right now at the grocery store or Target!” you may screech. In which case, leave! GO! Because you obviously do not comprehend or respect the beauty of a gorgeously fragrant soy candle. And please pick me up a case of Guava La Croix if you’re going to Target. I love that shit.
Soy candles burn cleaner (whatever that means) and don't smell like a teenager circa 2003 who just smoked a cigarette in the soccer fields and then immediately doused herself in Bath & Body Works body spray before heading back to AP-Calculus like many of the big box store candles do.
So, I’m no candle-making expert (whatever that means), but I’ve been making soy candles for my own personal use and gifting them for a few years now.

And one time, my cleaner was like, “Where did you get that candle you got me for Christmas?” and I was like, “I made it.” And she was like, “Huh. No shit.” That felt like a compliment, at least.
If you want to start making your own soy candles, here’s how to do it:
1. Gather supplies
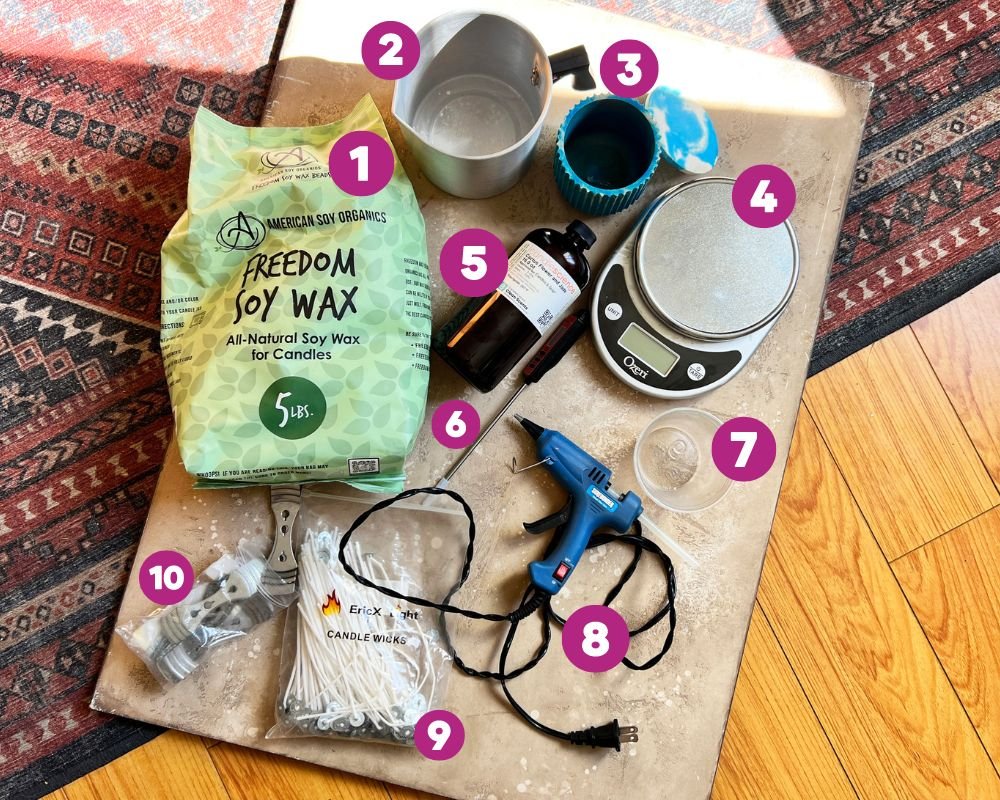
Pouring Pot; the smaller 2lb pot is pictured, but if you think you’ll make multiple candles or larger candles, you’ll want to get the larger 4lb pot. (I have both.)
Canister or votive. You can use whatever you want for your candle holder, as long as it’s heat resistant. I reuse a lot of mason jars. For this demo, I’m using a cement ridged holder made by my friend at Growies Planters.
A Cup; it can be disposable or something you reuse — just make sure it’s designated for fragrance oils only and never food or drink.
Pre-waxed Cotton Candle Wicks; I have the 2.5mm ones pictured above, but if you’re planning to make larger, wider candles, you’ll want a wick with a larger diameter. Here’s a guide to help with that.
Candle Wick Holders; I use the metal ones, but I know some people prefer wood ones.
Which fragrance should I use to make soy candles?
You need to use a fragrance oil specifically formulated for candle making. I’ve seen people using essential oils to make candles, but those don’t work – the flash point is too low. Meaning, when heated to the temperature required to melt the soy wax, the chemical make up of the essential oil is compromised.
For my soy candles, I’m a fan of CandleScience fragrance oils. They offer a wide range of fragrances that are reasonably priced. I love that they have 1oz options so you can test the scents before committing to a larger quantity.

I’ve amassed quite a collection over the years — and this is only part of it. Cactus Flower & Jade is currently my favorite scent.
2. Plug in your hot glue gun. While you wait for it to heat up, let’s do some math!
Calculate the amounts of wax and fragrance needed for your candle. To do this, take the total volume of your container, subtract 2 or more ounces (you’ll want at least ¼ inch for a lip when poured) and multiply that by 8%, or .08. Subtract that amount from the total volume to get the amount of wax you need.
TIP: If you don’t know the volume of your holder, pull out that digital scale and measure the volume using water.
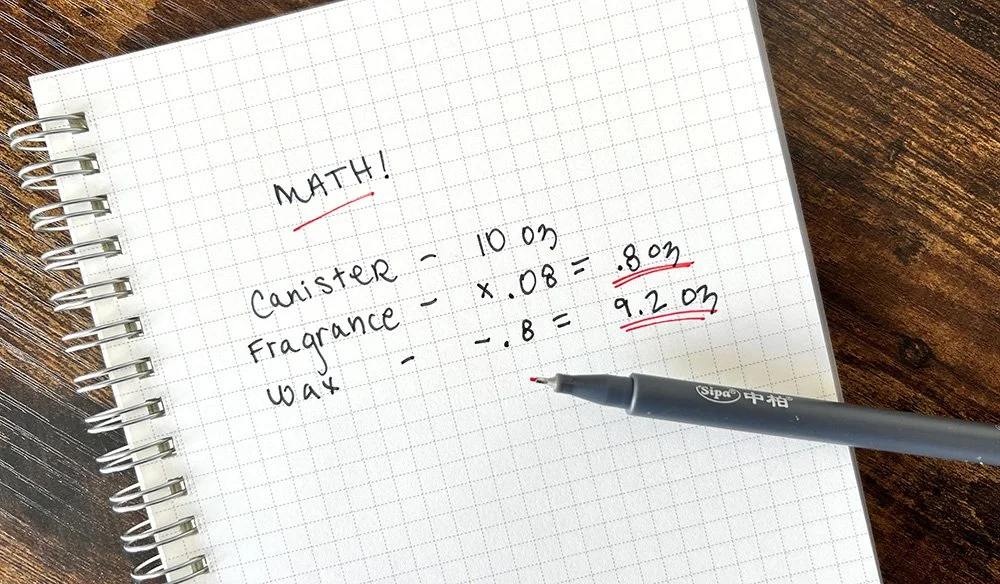
For my canister, I want to fill it to 10oz, so I’ll need .8oz of fragrance oil and 9.2oz of soy wax pellets.
Why 8%? CandleScience recommends 3-10% of fragrance oil for your candle. I find that 8% has a strong enough scent without being too overpowering. If you want a stronger fragrance, increase that percentage. If you want a more subtle one, decrease it to 3-5%.
Can I mix fragrance oils to create a custom scent?
Hell yeah. I do that constantly. A favorite combo right now is half-Sandalwood, half-Ocean Rose.
3. Weigh your wax and melt it.
Measure out your desired amount of wax pellets in the pouring pot and put it on the stove over medium-high heat. While that melts…
4. Prep your candle holder.
Make sure it’s clean and dry.
TIP: When washing out melted soy wax from a previous candle, let it soak in hot, soapy water for about 30 minutes. Drain the liquid and scrape the wax into the trash using a butterknife.
Put a dot of hot glue on the metal end of the wick, position it in the bottom center of your candle, and hold it in place for 20 seconds using the end of a pencil. When it’s dry, set it in place with a wick holder. Make sure it’s on a steady, stable surface to get ready for the hot wax pour.
5. Weigh your fragrance oil.
TIP: Remember to press and hold the TARE button to deduct the weight of the candle holder or cup before measuring out your wax pellets and fragrance oil. Personally, it had been a minute since I needed to weigh things other than my body.
6. Monitor temps & pour. Grab your thermometer!
When the wax pellets are completely melted, take the temperature. If it’s over 185° F, remove it from the heat. Let it cool to around 175° F while periodically monitoring the temperature. Once the temp is around 175° F, pour in the fragrance oil. Continuing monitoring the temperature until it’s 165° F or cooler.
TIP: There are 3 numbers you need to know: 185, 175, and 165.
185: Wax is melted enough to remove from heat.
175: Add fragrance oil.
165: Pour the candle.
7. Pour the wax and fragrance mixture into the holder, carefully and slowly.
Then, wait for the candle to set. Leave it alone for as long as possible! Disturbing even a steady surface will cause your wax to set wonky.
TIP: Once set, if the surface of your candle is uneven, melt a handful of wax pellets and pour a thin layer on the top of your candle. Then leave it alone, for real this time!
8. After a few hours of letting your candle cool, remove the holder and trim the wick.
I like to wait as long as possible to let my candle set, at least 12 hours. Once it’s completely opaque, you should be good (around 3-4 hours).
And there you have it! You’re a candle maker!

IMPORTANT: Wait at least 24 hours to light your candle for the first time and make sure it burns at least an hour to ensure an even lifelong burn.
TIP: Practice makes perfect! Or, you’ll play enough to figure out what you like. I think you’ll find it’s hard to massively fuck up a soy wax candle.
I’ve thrown candle making parties in the past, with everyone throwing a few dollars in for supplies. It’s a cute idea for a holiday party – you can get the seasonal CandleScience scents like Gingerbread and Juniper Berry and plan to gift them after. EVERYONE’S GETTING A CANDLE THIS CHRISTMAS!
A candle making party is also a cute idea for a Galentine’s Party. Did ya catch the classic Bath & Body Works Love Spell candle fragrance oil?
FINAL TIP: I promise! Get a separate sponge to clean your supplies and don’t ever put hot wax down your drain! If you need to get rid of hot wax, use a few layers of newspapers or paper towels so the wax doesn’t burn a hole through your trash liner.